Import Data
This page covers the following aspects:
- How To Import
- Import Configuration (General)
- Automatic Importing (Auto Import)
- Mailing Expert Mode for Admins
- Managing the Visibility of Imports (Access)
Important
CSV files that are to be imported need to be RFC conform !
How To Import
Quick Reference
- Click Import.
- Selecting or create an import.
- Click Test. Hereby the Upload button will be enabled.
- Click Upload and close the popup window.
- Refresh the employee list view by pressing the F5 key or clicking the refresh
button

Importing data requires the definition of an import (setting). Within the User Management, clicking the Import button will open a popup window for configuring or selecting given imports. Once an import is readily configured and chosen, you can select a CSV upload file via the Search system button (German: Durchsuchen) which is located at the end of the window. Please click the Test button which will effectuate a first data quality check. Hereafter, the Upload button will be enabled and an in-depth data quality check will be run.
Hint
What to do if the test runs and finishes at 100% but the Upload button isn’t enabled? Please check your file format and ensure that it is CSV!

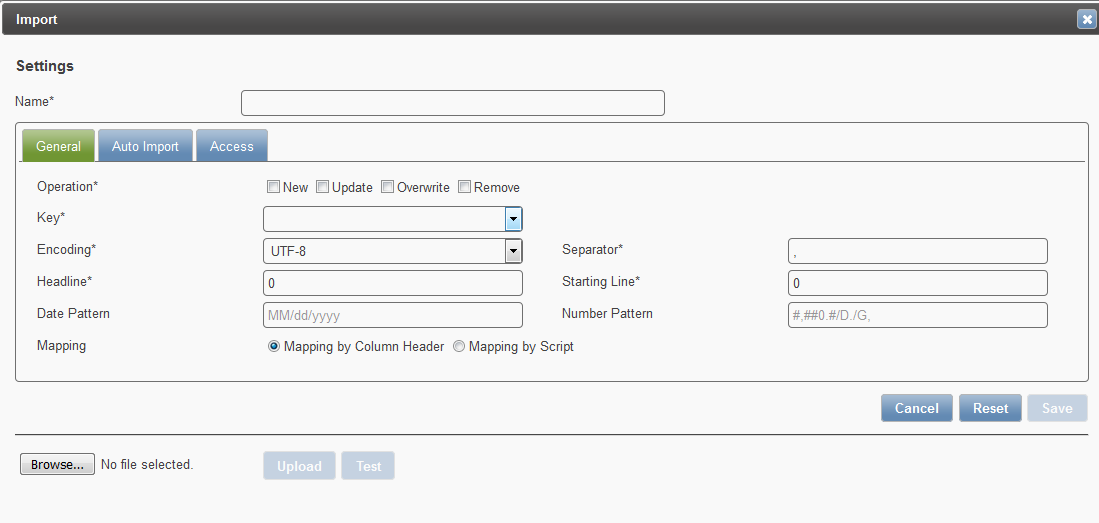
Import Configuration (General)
The import settings are structured in different tabs:
- General (settings may be accessed by all system roles)
- Auto Import (editable by system administrators only!)
- Access (editable by system administrators only!)
Operation
Determine how the Feeder shall handle import data. The most common use case is the combination of New + Update. By the way: most uploads will require an Import Key to identify existing records in Feeder. Attributes that may be used as import key need to be flagged unique!
| Operation | Explanation |
|---|---|
| New | Use this option for initial data uploads to Feeder. Does not require an import key |
| Update | Update existing records in Feeder if a matching record is found, reject otherwise |
| Overwrite (!) | Overwrite existing records in Feeder if a matching record is found. |
| Remove | Import data will be removed at match against existing records |
Warning
- When choosing Overwrite and updating records, please be aware that information that is not part of the import file but already in the Feeder system will be deleted!
- A mechanism was built in to solve this problem. Now the system will check whether a field that is actually not part of the import file already held a value beforehand. If the missing field is not empty the system will take over the old value. And if the target field was empty beforehand the field will stay empty and will be calculated in the on-going procedure.
var OBJ_TYPE = 'SFUser';
var FLD_PW = 'Password';
var FLD_EMP_ID = 'USERID';

var curId = toStr(obj.get(FLD_EMP_ID));
if (curId) {
       var existingObj = Helper.getByKey(OBJ_TYPE, FLD_EMP_ID, curId);
       if (existingObj) {
                      var pw = toStr(existingObj.get(FLD_PW));
                      if (pw) {
                                    return pw;
                      }
       }
}
// Code for calculation starts here
- Name
- The import (setting) will be saved under this name.
- Encoding
- Determine the way of converting data stemming from the delivering system. For example, when working with CSV files in Microsoft Excel use “Windows 1252”. Nevertheless - as Excel will not output UTF-8 encoded data - please consider working in Open Office. The preferred option should always be “UTF-8”.
- Separator
- Specify the separator that is used in the import file.
- Headline
- Please enter a number. The number will define the row of the import file where the headline is located. The most common value is “1”. If a file does not contain a headline, please enter “0” and specify an index based import script.
- Starting Line
- Please enter a number. The number will define the row of the import file where the (e.g. employee) data starts
- Date Pattern
- Specify the date structure that is used in the import file. E.g. “MM/dd/YYYY” or “dd.MM.YYYY”
- Number Pattern
- Is indicated by hash keys, zeros, commas and semicolons. Hashs signify that a value is possible but not necessary, zeros effect a digit filled with “0” if not indicated or left empty. The standard pattern is #,##0.#/D./G,, where the symbol behind “D” determines the digit separator and behind “G” the so called group separator.
| Number pattern | Format | Comment |
|---|---|---|
| # | -/- | A value is possible but not necessary |
| 0 | 1.49 -> 1; 1.5 -> 2 | Expects digit otherwise filled with zero. Returns integer |
| #0 | 1; 12; 20.2-> 20 | No digit expected. No leading zeros. Result: Integers |
| 00 | 1-> 01; 11-> 11 | Expects 2-digits. Leading zeros if 1-digit only is set |
| #,##0.# | 1; 1,200; 3.7 | Returns integers and rational numbers |
| #,##0.0 | 1->1.0; 1,200.0 | Returns rational numbers |
| #,##0.#/D./G, | 1,234,567.89 | Feeder default pattern with additional Java declaration |
| /D | Defines the decimal separator | |
| /G | Defines the group separator | |
| #,##0.#/D,/G. | 1.234.567,89 | Inverse meaning of dot and comma in the default pattern |
- Mapping by Column Header
- Please use this option if the spelling of the import file’s headline elements equals the spelling of the respective Feeder attributes.
- Mapping by Script
- The data from the import file will be transformed to the object attributes based on JavaScript code written by an administrator. Please note, that potential specifications made in the provided input fields for the date and number patterns no longer take effect and need to be scripted too, when this mapping option is chosen!
Important
If a unique user identification via Increment (system, customized) was configured, please use the global variable isTestImport to query a test case. Otherwise IDs from the current numerical series are wasted and ID gaps will result.
if (!isTestImport) {
    // do something if this is not a test import
}
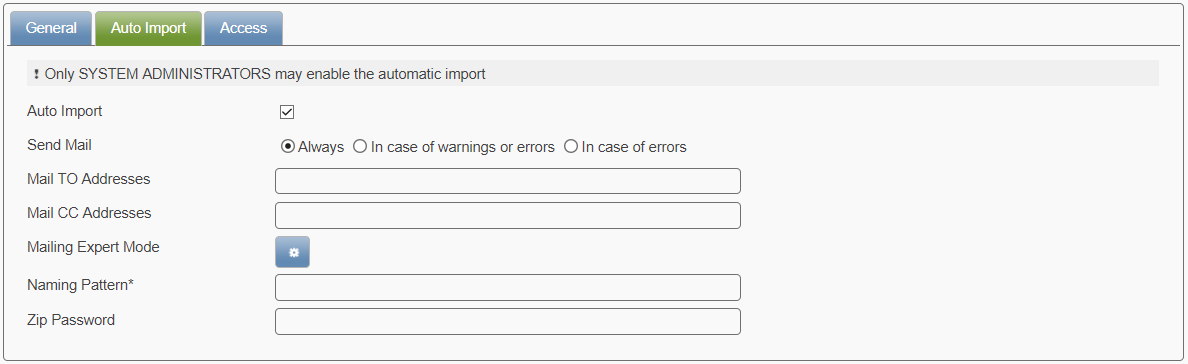
Automatic Importing (Auto Import)
- Auto Import
These settings are exclusive to administrators. When checked additional options become visible.
Important
Please be aware that automatic jobs require a global activation by system administrators! (Moreover: find information on how to set up scheduled imports for time slices)
Hint
As of Feeder v2.3 , all running jobs will be visible for system administrator(s) and will be listed in the Admin Cockpit.
Note
Keep in mind that Automatic Import Jobs need to be scheduled. They have to be processed one by one to avoid parallel execution. Automatic Export Jobs can be executet parallel.
- Send Mail
- Specify whether the e-mail recipient(s) shall always receive a notification, in case of warnings or errors or just in case of errors.
- Mail TO Addresses
Specify one or multiple e-mail recipients to inform about the scheduled import result. Please use commas for separating multiple recipients. The mail(s) will contain following information:
- Performing feeder instance
- Name of processed data file
- Import name (setting)
- Time slice
- Total number of processed records
- Number of processed records
- Number of warning records
- Number of failed records
- Duration of import process
- Mail CC Addresses
- Specify further recipient’s to notify in CC. lease use commas for separating multiple recipients.
- Mailing Expert Mode
- This feature allows to inform the recipients according to their area of responsibility. Please read more for details in the respective section Mailing Expert Mode for Admins.
- Naming Pattern
Specify the import file name that Feeder shall look for. If a given file is found in the /sftp/transfer/import directory, the automatic import job will import it at the given time (the import schedule is specified in the Feeder Configuration by a system administrator). For example:
- importfile.csv
- /subdirectory/importfile.csv
- any csv file using regular expressions (regex), e.g. with [.+?]
Important
Example: You would like to import all files that are characterized with the same wording in the name:
- HR_Test_20160801_1.csv
- HR_Test_20160701_B.csv
You can achieve this when specifying the file name with the regular expression [.+?]:
- HR_Test_.+?.csv
- Zip Password
- Errors and warnings found in the import file will be sent separately via e-mail attachment. Specify a password for encrypting the zip file. It is highly recommended to use this function in order to protect sensitive data.
Automatic Import Settings
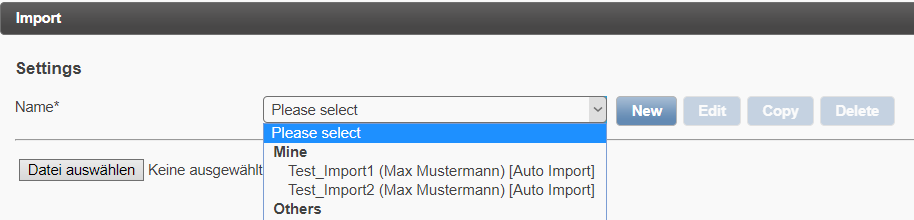
Once automatic import settings were configured within the system, you can always re-use your own customized settings or those of other administrator(s).
Note
Import settings do not have a schedule. For this reason, there is no additional information regarding the import settings in the dropdown list!
Mailing Expert Mode for Admins
This feature allows to inform different persons in charge according to their area of responsibility. Based upon JSON syntax, failed employee records will be routed by custom criteria and sent to the respective e-mail recipients (mailto and mailcc). In the given example, French HR managers will be notified for all failed employee records where COUNTRY = France.
{
    "criteria": {
        "COUNTRY": "France"
    },
    "mailcc": [
        "recipient3@pentos.fr"
    ],
    "mailto": [
        "recipient1@pentos.fr",
        "recipient2@pentos.fr"
    ]
}
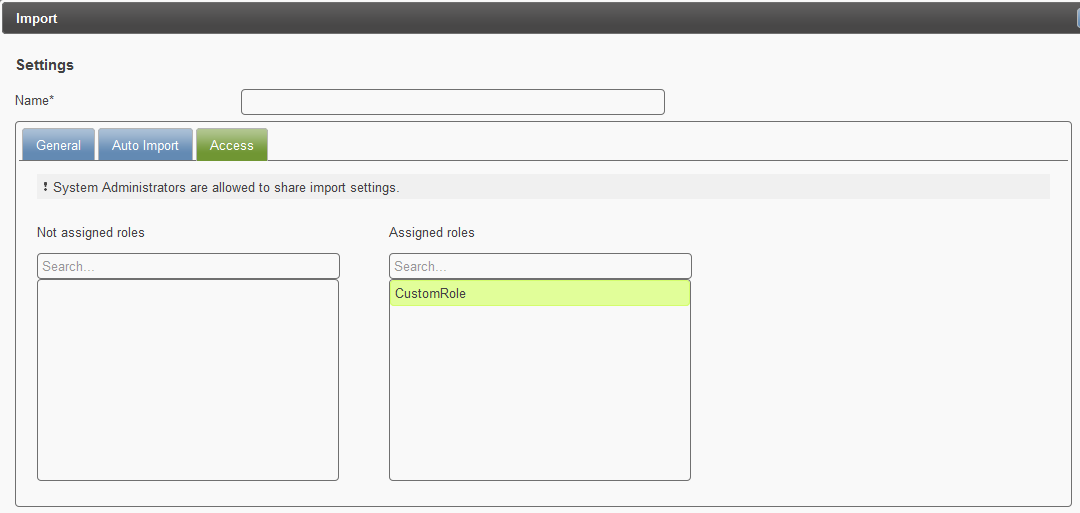
Managing the Visibility of Imports (Access)
This functionality is exclusive to system administrators. It allows to manage the visibility of import settings role specifically. Only the role assigned to an import (or export) may see the import (or export). Here the CustomRole. In this way, other imports and exports can be hidden (typically automatic jobs).